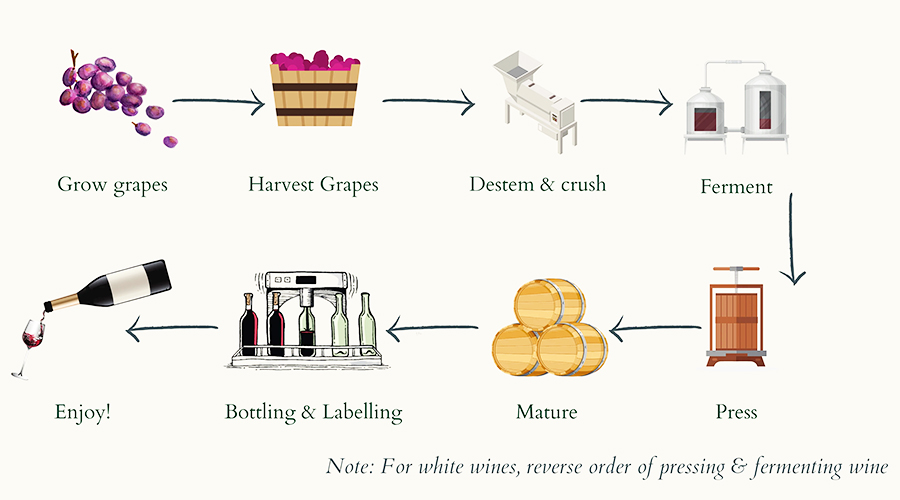
Red wine making is a meticulous craft that combines both scientific precision and artistic intuition. While nature provides the grapes, the process of turning them into wine requires careful attention at each stage to ensure the final product is of the highest quality. From harvesting to bottling, every step plays a crucial role in shaping the wine’s color, aroma, flavor, and balance. Below is a clear and professional step-by-step guide to the red wine making process.
1. Harvesting and Inspecting Grapes
The first step in winemaking begins with the harvest. Ideally, grapes are picked when their sugar content is between 23–25° Brix, which ensures that there is enough sugar for proper fermentation and alcohol production.
Upon arrival at the winery, grapes should be thoroughly inspected to remove any shriveled, moldy, or spoiled bunches. This is essential to prevent the introduction of off-flavors or spoilage into the final wine. Healthy, ripe grapes are the foundation of quality wine.
2. Pressing and Destemming
2.1 Pressing the Grapes
Pressing serves to gently open the grape skins, releasing the juice while leaving the seeds and skins intact. The goal is not to crush the grapes but to facilitate yeast access to the juice. The grape stems should be removed to prevent the bitter flavors they can impart.
Small batches of grapes can be handled manually using mesh bags or small presses.
Larger quantities (over 50 pounds) typically require a mechanical destemming and pressing machine. This machine separates the stems from the grapes, while the juice, skins, seeds, and pulp fall into fermentation tanks.
For red wine, the fermentation takes place with the skins on, allowing for the extraction of color, tannins, and flavor compounds, which contribute to the depth and complexity of the wine.
3. Protecting Grape Juice with Sulfur Dioxide
3.1 Inhibiting Wild Yeasts and Bacteria
Fresh grape juice naturally contains wild yeasts and bacteria. While some of these microorganisms are harmless, others can cause off-flavors or lead to fermentation problems. To mitigate this risk, sulfur dioxide (potassium metabisulfite) is added immediately after pressing.
50 ppm of sulfur dioxide is typically used for healthy, clean grapes.
Up to 100 ppm may be used for grapes that are in poorer condition or affected by mold.
Sulfur dioxide acts as a preservative, preventing the growth of spoilage organisms without harming the selected wine yeast that will eventually ferment the juice.
4. Testing and Adjusting Grape Juice
Before adding yeast, it’s important to test the grape juice for the following parameters:
Sugar content (Brix)
Total acidity
pH value
Since few grapes naturally achieve the ideal balance, adjustments may be necessary to ensure the juice falls within the desired range. Correcting these factors early on significantly improves the likelihood of creating a balanced and high-quality wine.
5. Primary Fermentation
5.1 Initiating Fermentation
After the addition of yeast, fermentation typically begins within 1-3 days. Fermentation occurs as yeast consumes the sugar in the grape juice, converting it into alcohol and carbon dioxide. The rising carbon dioxide causes the grape skins to float to the surface, forming a thick cap.
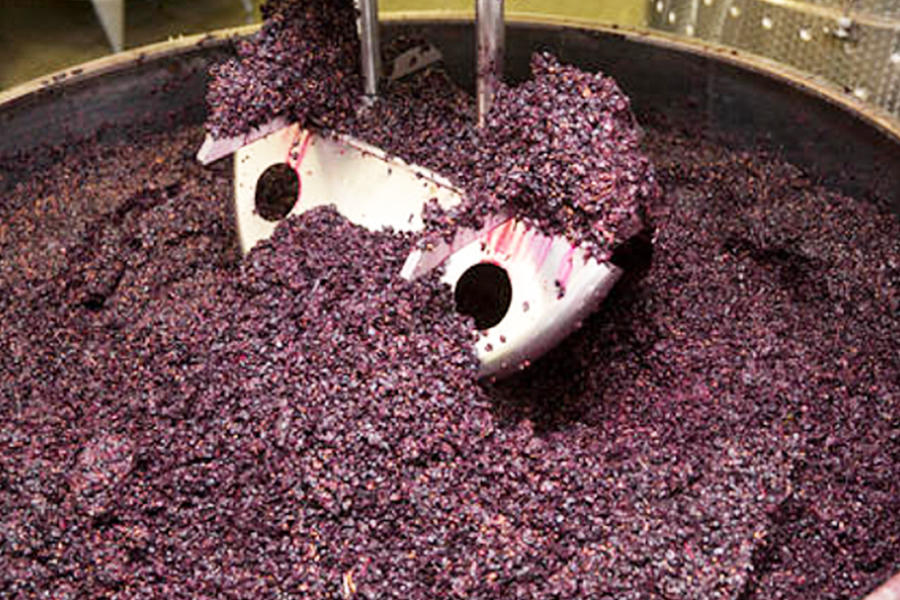
5.2 Cap Management (Punching Down)
The cap must be punched down several times a day to ensure that the skins are submerged in the juice. This process serves multiple purposes:
It enhances the extraction of color, tannins, and flavors.
It helps release excess heat generated during fermentation.
It prevents the cap from drying out, which can lead to bacterial contamination.
Each time the cap is broken, the lees at the bottom of the fermentation tank should also be stirred to keep the yeast suspended and reduce the risk of undesirable flavors.
It’s important not to crush the grape seeds during this process, as they contain bitter tannins that can adversely affect the wine’s taste.
6. Pressing After Fermentation
Once fermentation is complete and sufficient extraction has occurred, the next step is to press the wine to separate it from the remaining solids (skins, seeds, and pulp). Delaying the pressing can lead to the development of off-flavors, so this step should be done promptly.
7. First Racking (Removal of Coarse Lees)
7.1 Settling and Racking
After pressing, coarse lees (heavy sediment) will settle at the bottom of the fermentation vessel within 24-48 hours. These coarse lees contain undesirable bitter compounds and should be removed as soon as possible.
The wine is carefully transferred to clean containers, leaving the coarse lees behind. A small amount of fine lees (smaller sediment) will remain, which can be beneficial for the next stage—malolactic fermentation.
8. Malolactic Fermentation (Secondary Fermentation)
8.1 The Malolactic Process
Malolactic fermentation (MLF) is a secondary fermentation process where lactic acid ba
cteria convert tart malic acid (found in grapes) into softer lactic acid (found in dairy products). This process softens the acidity of the wine, increases its body, and gives it a smoother mouthfeel.
Most red wines undergo malolactic fermentation, which typically lasts between 4 to 6 weeks, although it may complete faster under ideal conditions.
Once MLF is confirmed to be complete, the wine undergoes another racking to remove the sediment left behind from the bacterial fermentation process.
9. Fermentation and Adjustment
9.1 Sulfur Dioxide Addition
After malolactic fermentation, sulfur dioxide is once again added to the wine to prevent oxidation and spoilage. From this point until bottling, it is essential to maintain the proper sulfur dioxide level.
9.2 Adjusting pH and Acidity
Malolactic fermentation naturally raises the pH and lowers the acidity of the wine. Therefore, it is important to test and taste the wine to ensure the pH and acidity are in balance.
The pH of red wine typically ranges from 3.4 to 3.65.
Adjustments to acidity or pH may be made at this stage to ensure that the wine remains balanced.
10. Transfer to Aging Containers
After making the necessary adjustments, the wine is transferred to aging containers such as oak barrels, glass jars, or stainless steel tanks. This step serves to remove any remaining lees and nutrients that could support microbial growth.
Aging should occur under stable conditions:
Temperature: Maintain a constant temperature of 55-60°F (13–16°C).
Regular tastings should be performed every 4–6 weeks to monitor the wine’s development, and sulfur dioxide levels should be regularly checked.
11. Aging, Clarification, and Bottling
11.1 Aging Process
After approximately one year of aging, the wine will have become more integrated, rounded, and smoother. During this time, the wine develops complexity, with flavors from the oak and tannins softening to create a harmonious balance.
11.2 Clarification
Before bottling, the wine may undergo clarification to improve its clarity and texture. Clarifying agents bind to tannins, proteins, and other compounds, allowing them to settle at the bottom of the container. After settling, the clarified wine is racked off from the sediment.
11.3 Filtration
For wines that require further refinement, filtration may be used to remove any remaining particles, ensuring a clear and polished final product. Filtration is typically done using a porous material similar to coffee filters.
11.4 Bottling
Once the wine has aged, clarified, and filtered, it is ready for bottling. This is the final step of the winemaking process, after which the wine enters the market or is stored for further aging, depending on the wine style.
By following these steps with precision and care, winemakers can produce red wines that are rich, complex, and full of character. Each stage in the process contributes to the ultimate flavor profile and aging potential of the wine, making the craft of winemaking both rewarding and intricate.